Tile image selection for a photo-mosaic
- MyPhotoFusion
- Mar 1, 2022
- 4 min read
Updated: Apr 9, 2022

You might already have a selection of images within you photo collection you are keen to use for the mosaic. Some things to consider with the tile photo selection that will be used to create your mosaic are:
Does the content of the tile images fit with the overall theme of the main image you have selected as the base of the mosaic, this is an artistic choice but a picture of a car made of tiles of cat images might not be what you wanted?
Do we have enough tiles images to give enough selection to the software to best match the tile images to the main image crop section (each tile location is cropped from the main image and matched to each tile in the library of images to find which matches the closest)


Examples of main image tile crop at the bottom and the selected best match tile image from the library that will be used in that tiles location.
Do we have a tile library with a good colour range that compliments the main image selected? Having a mainly blue image with all green landscape tiles will be tricky to recreate without overly tinting the tile colours.
Is there enough variation/variety in the framing and details within the tile library to try and give a good selection for the software to match against as both colour & feature details within the tile images are important for a good overall match.
The overall number of tiles you can provide has an impact on the quality of the mosaic, providing more images can help to get the best possible image match for each tile location within the mosaic. We mention on the website that ideally we'd like 350-500 images for standard size mosaics but something between 1-2k could help give the best results. For mosaics that use very few tiles the image match is even more important and as such is even harder to produce than a mosaic with a lot more tiles. In these hyper mosaic type images you can use upwards or 10-15k tile images to try and get pleasing results (But when it works it really shows off the medium and highlights the clever tile selection).
The size of the mosaic also has an impact on the total number you ideally need to avoid over duplication of the images. In an average mosaic you might have between 1500-2500 tiles, so you can see with a tile library of 500 images you will already need a number of duplications.
Also not all images will be selected for the mosaic (but if required we can force all images to be used within the mosaic) due to bad match to the main image for some reason and will not be used to maximise the quality of the final mosaic image.
The number of tiles is defined by the overall image size and the size of the tiles used, ideally we don't want to go too small on the tiles as these should be clearly visible when viewed up close. Between 12-15mm tile width would normally be the smallest we'd recommend for clarity of the tile image in the overall mosaic. As the mosaic gets larger you can obviously start to increase the size of your tile images to keep a reasonable balance. It's not all about number of tiles and quite often mosaics can look worse as they have used too many tiles and made them too small.
To maximise the number of tiles and possibility of good match to the main image crop we will automatically crop & rotate you images to give more alternative selection options, maximising the possibility of a good match from your tile images. This can be controlled if you have images in the tiles you do not want any rotation, flipping, mirroring happening etc. This is a really good way of boosting the mosaic quality by gaining extra tile variations without providing a huge number of tile images.


Examples above show tile variants created from taking a single tile images and rotating & flipping to create more options for a better match to main image section - top left is original provided tile.
Within the software we use we will try and ensure images are not duplicated next to each other or within a set distance of the same image within the final mosaic. It's also possible for us to select a specific image to be in a given tile location if this is required or desired. This makes it safe and feasible to allow tile duplication without making it obvious.
The tile library colours will also never really be a perfect match to the main image colour so there is always a degree of colour tinting that is required to better represent the main image in the mosaic. This tinting amount is controllable and can be set to your preference.

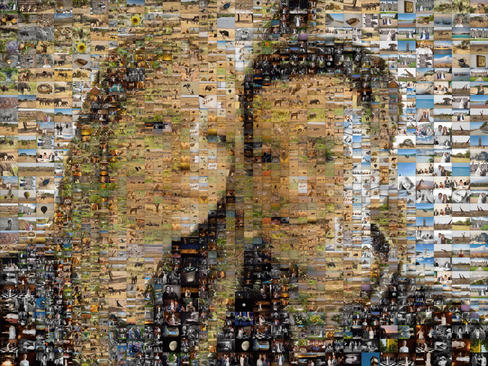


Examples above show tile tinting to better represent the colour from the main image. The image on the left has no tinting applied and is unmodified raw tile images (tile arrangement alone is creating the main image using the details, features & colour from the tile images) The image on the right is applying colour tinting to the images to bring them more in line with main image colour. No image blending is used and we try to be sympathetic in the tinting to not corrupt the feel of the tile images.
I hope this helps give some information regarding your tile image selection, what's important and how the tiles you select can have a big impact on the overall quality and success of the mosaic. When you work with us at MyPhotoFusion we'll try and assist you and provide feedback if the provided tiles are working or what can be done to help improve things.
If you have any questions or would like more information on what we do, how we can help you create a beautiful photo-mosaic or collage please contact us at info@myphotofusion.com


Comments